Introduction to Backyard Canvas Tents
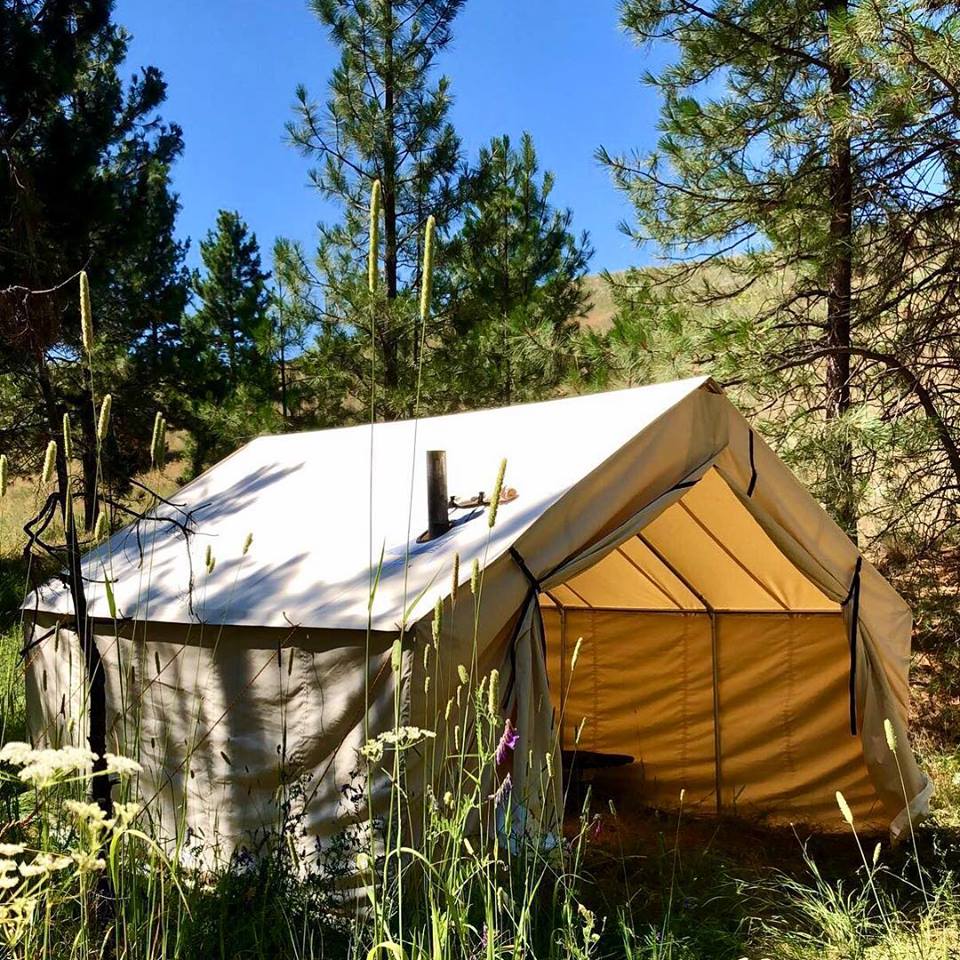
Creating your own backyard canvas tent can transform your outdoor space. It’s a fun, DIY project that adds a personal touch to your home. These tents are perfect for hosting friends, relaxing with family, or just enjoying some quiet time. They also make for an impressive feature when entertaining guests or can become a whimsical play area for kids. With some basic materials and a sprinkle of creativity, you can set up a cozy retreat right in your backyard.
Building your tent requires careful planning and execution. You’ll need to choose the right materials, such as a high-quality canvas and sturdy branches. You must also have the right tools, like a grommet kit, ropes, and stakes. The process involves preparing the canvas, constructing the frame, and setting up the structure securely. To make your tent inviting, consider adding comfortable bedding, weatherproofing supplies, and decorative elements.
Whether you’re looking for a unique space to unwind or a special spot for guests to stay, a DIY canvas tent is versatile. It can be a weekend project that pays off with endless hours of enjoyment. This guide will walk you through the steps to create a charming and functional backyard canvas tent.

Choosing the Right Materials
Choosing the right materials is crucial for a durable and functional DIY canvas tent. Select materials that will withstand the elements and provide comfort for your backyard retreat. Start by selecting a high-quality canvas. Look for canvas made from cotton or a cotton blend, as it’s durable and breathable. The weight of the canvas is also important; a heavier canvas provides more protection and longevity.
Selecting Your Canvas
Opt for waterproof or water-resistant canvas to keep moisture out. Double-check the measurements of your outdoor space to ensure the canvas size fits well. Make sure your canvas is a heavyweight material, around 10 oz. per square yard or more, for a sturdy setup.
Finding Sturdy Branches and Dowels
Search for branches that are strong and straight. These will serve as the main supports for your tent. Choose branches around 5 feet in length or according to your desired tent height. Dowels should fit snugly into drilled branch tops, so measure the dowel diameter before purchasing.
When gathering these materials, keep in mind the overall structure and design you aim to achieve. Heathier, straighter branches provide better support, and high-grade canvas ensures your tent endures various weather conditions. These choices in materials pave the way for a successful DIY project and an inviting backyard canvas tent.
Essential Tools and Supplies
To create your DIY canvas tent, certain tools and supplies are needed.
Grommet Kit and How to Use It
A grommet kit is essential for adding reinforced holes to your canvas. It usually comes with a punch tool and grommets. Follow the accompanying instructions to install them correctly.
Ropes, Twine, and Stakes Selection
Choose sturdy ropes for securing the tent structure. Twine is useful for tying canvas edges to stakes. Opt for heavy-duty stakes that can anchor your tent firmly to the ground.
Gathering your materials is the first step to ensuring a successful DIY canvas tent project. With the right tools and supplies, you’ll be able to construct a sturdy and beautiful backyard retreat that’s perfect for any occasion.
Preparing the Canvas
Measuring and Marking for Grommets
To start, lay out your canvas on a clean, flat surface. Measure the fabric to find the center for grommet placement. Mark two spots at the top, these will be your peak points. Then, mark one in each corner of the canvas bottom. Use chalk for visible, washable marks. Keep your measurements precise for even grommet spacing.
Attaching Grommets to the Canvas
Once you’ve marked your canvas, it’s time to attach the grommets. Your grommet kit will guide you through the process. Punch holes where you marked, then place a grommet in each hole. Use the kit’s tools to secure the grommets. This will reinforce the holes, making them strong for supporting the tent structure. Double-check each grommet is snug and secure, ensuring durability for your tent.
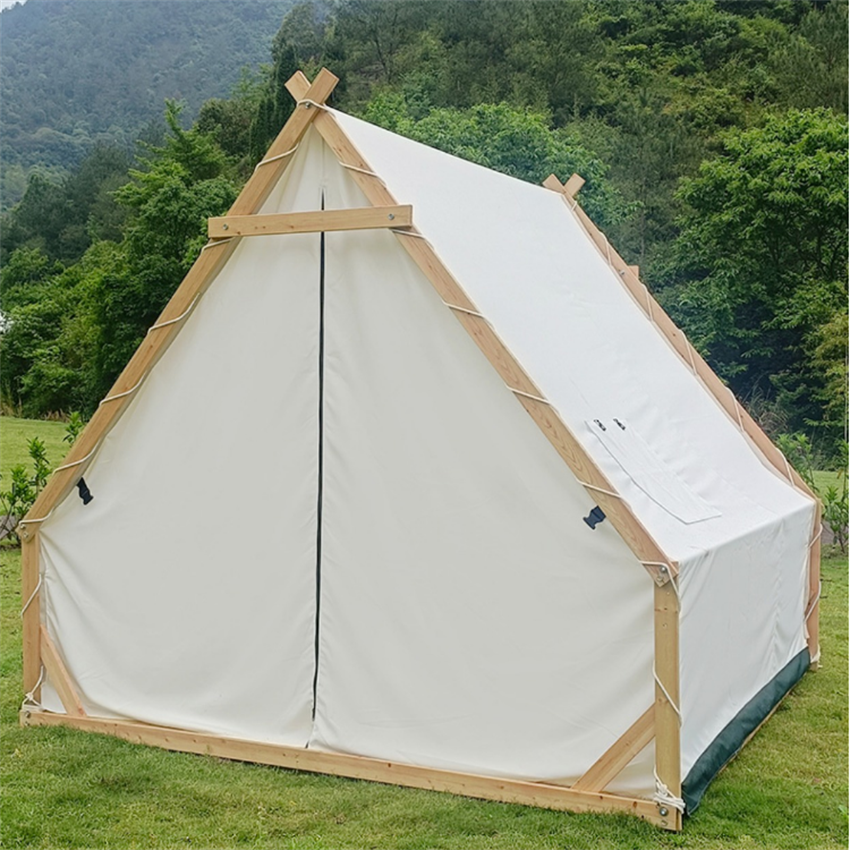
Constructing the Tent Frame
Constructing the frame is a key step in your DIY canvas tent project. It builds the foundation that shapes your tent and gives it stability. To begin, you’ll need to ensure all materials are ready and appropriate for their roles.
Cutting Branches to Size
First, measure the branches. They should be the same height as your tent’s peak. Use a saw to cut each branch to the precise length required. Aim for a clean cut to ensure a flat base for stability.
Drilling and Dowel Insertion Techniques
Next, drill a hole at the top end of each branch, deep enough to secure a dowel. The dowel will act as an anchor for the tent peak. Select the right drill bit size to match your dowels. Insert the dowel into the drilled hole snugly. Check the dowel is fixed securely to avoid any wobbling.
This step requires accurate measurement and careful handling of tools. The dowels must fit perfectly to achieve a stable frame. Take your time with these tasks to ensure the safety and stability of your canvas tent. Once the branches and dowels are prepared, you’re ready for the tent setup.
Setting Up Your Canvas Tent
Setting up your DIY canvas tent is straightforward and satisfying. Follow these steps for a sturdy and stable retreat in your backyard.
Assembling the Frame and Canvas
Begin by standing one branch upright. Slide the center grommet over the dowel at the top of the branch. Secure the canvas by tying the rope tightly around the dowel. Position the other branch opposite and repeat these steps. Ensure both branches are parallel and the canvas is taut.
Securing the Tent with Ropes and Stakes
Once the canvas is draped over the frame, stretch it out and secure with ropes. Use the corner grommets to attach twine and pull each corner tight to stakes in the ground. Double check stakes are firmly in the ground for strong support. This will safeguard your tent against wind and movement.
Your canvas tent should now stand proudly, ready to be filled with cozy amenities. Ensure all ropes are tight and the structure stands firm before proceeding to add comforts.
Making Your Tent Cozy and Comfortable
Creating a cozy and comfortable space is key to enjoying your DIY canvas tent. Here is how to enhance the comfort of your backyard retreat.
Adding Blankets and Pillows
Start by laying out soft blankets on the tent floor for cushioning. Pile on throw pillows for extra comfort. Choose items that can withstand outdoor conditions but still provide warmth and support.
Weatherproofing Your Canvas Tent
Protect your tent from the elements to keep it cozy. Consider applying waterproofing spray to the canvas. This will help keep the interior dry during damp weather. Ensure the bottom edges of your tent have ample weight to prevent flapping in the wind.
By following these steps, your DIY canvas tent becomes a snug haven. It is perfect for relaxing or spending time with friends and family in your backyard. Keep these tips in mind to make the most of your homemade canvas retreat.
Additional Amenities and Decor Ideas
Enhance the charm of your DIY canvas tent with some thoughtful additions and decor.
Creating a Communal Area
Design an inviting space for shared moments. Set up comfortable seating like benches or bean bags. Add a central table for games, snacks, or drinks. Consider a fire pit as a warm focal point. String up fairy lights above for a twinkling evening ambiance.
Adding Lighting and Entertainment Options
Brighten the interior with lanterns or LED candles for a soft glow. Place solar-powered lights around the exterior for safety at night. Include board games, playing cards, and books for guests’ entertainment. Add a Bluetooth speaker for ambient music. Include a hammock or swing nearby for lazy afternoons.
With these amenities, your backyard canvas tent can become the go-to spot for leisure and socializing.
Tips for Maintaining Your DIY Canvas Tent
Maintaining your DIY canvas tent is essential for its longevity and appeal. Here are practical tips for keeping your tent in top condition.
Cleaning and Storing Your Tent
Regular cleaning is crucial. Gently brush off any loose dirt and spot clean spills with mild soap and water. Avoid harsh chemicals that can damage the canvas fabric. Ensure your tent is completely dry before storing to prevent mold and mildew. Store your tent in a dry, cool place, ideally in a breathable bag to discourage pests and dust.
For deep cleaning, set the tent up and use a soft brush and mild detergent. Rinse thoroughly with a garden hose and let it air dry completely in the sun.
Seasonal Considerations and Care
Your tent will face different challenges each season. In winter, store your tent indoors to protect it from harsh weather. During spring and fall, check for and repair any damage before and after use to prepare for the next season.
In summer, position your tent in a shady area to protect the fabric from UV damage. If not possible, consider using a UV protectant spray to shield the canvas.
Finally, regular inspections are key. Look for signs of wear and tear, especially before and after each use. Address small repairs promptly to avoid larger issues.
By following these maintenance tips, you can enjoy your backyard canvas tent for many seasons to come.
Conclusion: Enjoying Your Backyard Retreat
After following the outlined steps, your DIY canvas tent is now ready. It stands as a personalized retreat right in your own backyard. Imagine the hours of relaxation, fun, and memories awaiting within its cozy confines. Your hard work results in more than just a structure; it creates a space for connection, reflection, and enjoyment.
This self-made sanctuary brings versatility to your home space. Use it for solitary escapes, intimate gatherings, or joyous family time. It suits many occasions, from lazy afternoons to lively evenings under the stars. With each use, the tent becomes a cherished part of your home.
Your DIY approach saves money and adds a personal touch. It reflects your style and meets your specific needs. More importantly, it brings a sense of accomplishment. Every look at the sturdy canvas and each moment spent inside reminds you of what you’ve created.
Remember to give your tent love and care. Regular cleaning and proper storage extend its life and preserve its charm. It’s worth the effort to maintain this special addition to your home.
The beauty of it all? You can always adapt and transform the tent over time. Update it with new amenities, shift its location, or alter its decor. The tent is a reflection of your evolving tastes and needs.
So, step inside, breathe in, and relax. Your backyard canvas tent journey has just begun. Enjoy the fruits of your labor and make every moment special. Here’s to many days and nights of backyard bliss!