
I. Introduction to Tent Repair
A. Importance of Regular Tent Maintenance and Repairs
Regular tent maintenance and repairs are crucial for ensuring the longevity and performance of your tent. They help address and prevent potential issues, extend the lifespan of the tent, and provide a safe and comfortable camping experience.
B. Understanding Common Tent Damage
Tents can suffer from various types of damage, including tears, holes, malfunctioning zippers, and worn-out fasteners. These issues can occur due to wear and tear, rough handling, or exposure to harsh weather conditions.
C. Exploring the Benefits of Proper Tent Repair
Proper tent repair offers several benefits. It saves money by avoiding the need to purchase a new tent, extends the life of your existing tent, enhances its performance and functionality, and ensures a more enjoyable and comfortable camping experience.
II. Assessing Tent Damage
A. Identifying Tent Tears and Holes
- Inspecting Tent Fabric for Tears and Holes
Thoroughly examine the tent fabric to identify any tears, punctures, or holes. Check both the tent body and the rainfly for damage.
- Evaluating the Extent of Damage
Assess the size, location, and severity of the tears and holes. Determine if they are minor and easily repairable or if professional repair or replacement may be necessary.
B. Examining Tent Zippers and Fasteners

- Checking Zippers for Snags and Malfunctions
Inspect the zippers on doors, windows, and other openings for any snags, jams, or malfunctions. Test their smooth operation to ensure they are functioning properly.
- Repairing or Replacing Fasteners as Needed
Examine other fasteners, such as buckles, clips, and hooks, for signs of damage or wear. If any are broken or worn-out, consider replacing them.
III. Repairing Tent Tears and Holes
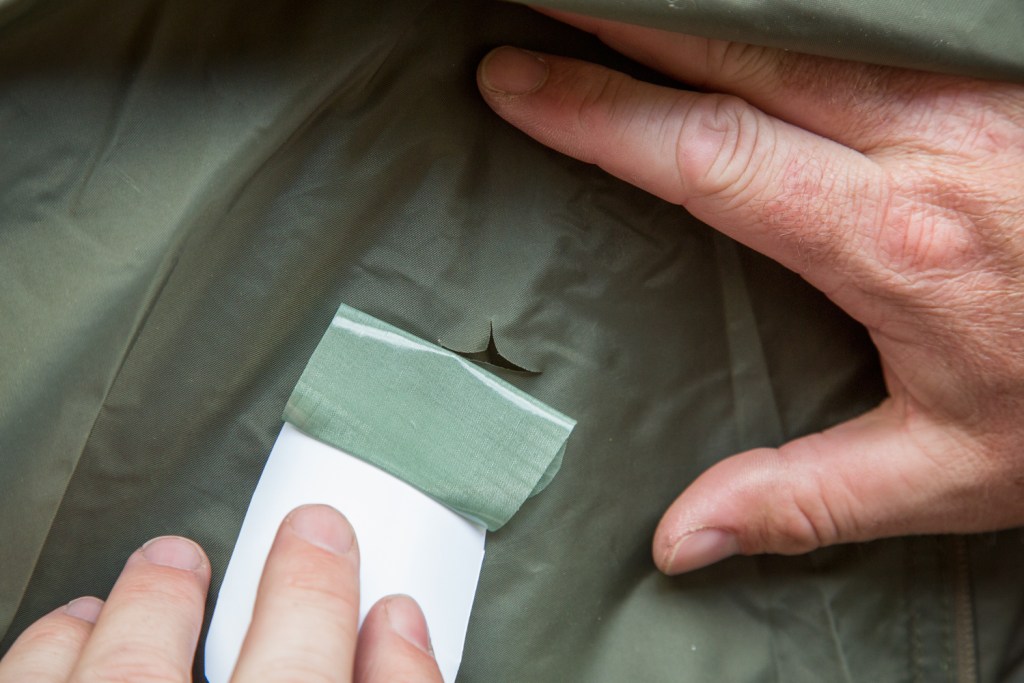
A. Patching Small Holes with Adhesive Tape
- Applying Patching Tape for Temporary Fixes
For small holes or tears, use adhesive repair tape to patch the damaged area. Apply the tape to both sides of the hole for a secure and temporary fix.
- Ensuring a Proper Seal and Longevity
Smooth out any air bubbles or wrinkles in the tape and press it firmly onto the fabric to create a strong and waterproof seal. Trim any excess tape for a neat finish.
B. Sewing Repairs for Larger Tears
- Gathering Necessary Sewing Supplies
If the tear is larger or the fabric is severely damaged, sewing repairs may be necessary. Gather a sewing needle, thread, and fabric patch that matches the tent material.
- Stitching Tent Fabric for Long-lasting Repairs
Carefully sew the torn edges together using a strong, double-stitch technique. Reinforce the repaired area by sewing a fabric patch over the tear, ensuring a secure and durable repair.
IV. Fixing Tent Zippers and Fasteners
A. Lubricating Stiff or Stuck Zippers
- Applying Lubricant to Free-up Zipper Movement
If zippers are stiff or stuck, apply zipper lubricant or wax to the zipper teeth. Gently work the lubricant into the zipper, moving it up and down to loosen any debris or corrosion.
- Testing Zipper Functionality and Repeating as Needed
Test the zipper’s movement and functionality after applying lubricant. If it is still not working smoothly, repeat the lubrication process until the zipper moves freely.
B. Replacing Broken Zippers and Fasteners
- Removing and Replacing Faulty Zippers or Fasteners
If a zipper or fastener is broken beyond repair, carefully remove it from the tent. Replace it with a new zipper or fastener of the appropriate size and type. Follow manufacturer instructions or seek professional help if needed.
- Ensuring Proper Installation for Improved Functionality
During the replacement process, ensure that the new zipper or fastener is correctly installed and aligned with the existing fabric. Double-check its functionality before completing the repair.
V. Seam Sealing and Waterproofing
A. Inspecting Tent Seams for Weakness or Leakage
Inspect the tent seams for signs of weakness, fraying, or leakage. Pay particular attention to seam areas that may have been damaged or worn out over time.
- Identifying Areas Requiring Seam Sealing
Identify areas where seam sealing is necessary. These may include seams that have separated, areas with visible gaps or holes, or spots where leakage has occurred in the past.
- Addressing Micro Leaks and Reinforcing Seams
Apply seam sealer to the identified areas using a brush or applicator. Ensure that the sealer is evenly applied to create a strong and waterproof seal. Allow the sealer to dry completely before using the tent.
B. Waterproofing Tent Fabric
- Applying Waterproofing Spray or Solutions
To enhance the tent’s waterproofing capabilities, use a waterproofing spray or solution specifically designed for tent fabrics. Apply it evenly to the entire tent surface, following the manufacturer’s instructions.
- Maintaining Water Repellency for Outdoor Protection
Periodically reapply waterproofing to maintain the tent’s water repellency. This helps prevent water from seeping through the fabric, keeping the interior dry and comfortable during rainy conditions.
VI. Preventive Maintenance for Tent Longevity
A. Regular Tent Cleaning and Drying

- Removing Dirt and Debris from Tent Surfaces
Regularly clean the tent to remove dirt, debris, and stains. Use a soft brush or sponge and mild soap to clean the tent fabric, and rinse it thoroughly. Allow the tent to air dry completely before storing it.
- Properly Drying the Tent to Prevent Mold and Mildew
Ensure the tent is completely dry before packing it away. Moisture trapped in the fabric can lead to mold and mildew growth, which can damage the tent and create an unhealthy camping environment.
B. Storing the Tent Properly
- Folding and Packing the Tent to Avoid Damage
Fold and pack the tent carefully to avoid unnecessary creasing or damage. Follow the manufacturer’s instructions for folding and rolling the tent, and avoid overstuffing the storage bag.
- Choosing a Suitable Storage Location
Store the tent in a cool, dry, and well-ventilated area to prevent moisture buildup and protect it from pests or rodents. Avoid storing the tent in direct sunlight, as this can cause fabric deterioration over time.
Conclusion:
Tent repair is a valuable skill for outdoor enthusiasts, allowing them to extend the lifespan of their tents and save money on replacements. By assessing tent damage, repairing tears and holes, fixing zippers and fasteners, seam sealing, and practicing preventive maintenance, campers can enjoy a durable and reliable tent for many outdoor adventures to come. Embrace tent repair and ensure your tent remains in excellent condition for your next camping trip.